Oil lamps are one of the oldest sources of light. Yet, it’s easy to make a beautiful mason jar oil lamp using locally available supplies. You can even customize it using some creative additions like citrus fruits, flowers, and glass beads.
Besides, you can also use festive decorations to create some handmade gifts for your friends during the holidays.
Still, if you have a romantic date or when you want to pamper yourself, adding fragrant oils sets the atmosphere.
How to Make an Oil Lamp out of a Mason Jar?
Here is a step by step guide on how to make a mason jar oil lamp in just a few minutes.
-
Step 1: Gather The Materials

The first step is to collect all the supplies required for the project. You need
- A mason jar and lid,
- Olive oil or other lamp oil,
- Wire cutter,
- A hammer,
- Screwdriver or nail,
- And cotton wick.
Depending on your preferences, you can also include herbs, dried fruits, flowers, spices, and any essential oil or fragrances.
-
Step 2: Drill A Hole In the Mason Jar
If you choose to make a lidded jar oil lamp, begin by drilling a hole on the lid. Place it upside down and, using a screwdriver, punch an outlet at the middle.
You can also use a nail and hammer it down, and once you poke an opening, wiggle it out. Keep the hole wide enough to support the wick holding it over the lid. Using pliers, widen the space by peeling the edges.
Next, cut a piece of the wick, ensure that it’s longer than the jar depth, and then slip it through the hole.
Wrap the tip with tape to prevent it from unraveling. Slip a metal nut over the wick to hold it into position and hide the hole so that your lamp looks neat.
Ensure that the lamp doesn’t stick more than 2.5 centimeters out of the jar lid. If it’s too long, it will cause your lamp to smoke, and you may have to trim it shorter. Once you have the wick over the nut and hole, snip off the tape.
-
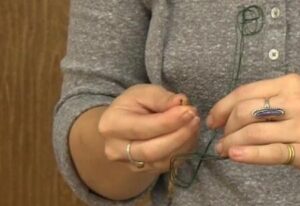
Step 3: Use A Cork Or Wire To Hold The Wick
If your jar doesn’t have a lid or don’t want to poke a hole in it, you can use cork from your wine bottle or purchase one from a craft shop.
It helps keep the wick afloat. Ensure that the stopper is at least ¼ inch thick and cut it with a knife to give it a flat bottom.
Using a needle or nail, poke a hole at the center of the cock and slip through the wick. Maintain the required hole length to ensure that the wick won’t slip off once you place it upside down. Remember to keep the wick not more than 2.5 centimeters above the cork.
If you choose to use a wire, cut thin pieces and hook double strands over the jar’s mouth. It also aids in supporting the wick. Place the wick at the middle of the two wires and twist them to sandwich it in between.
Keep the wires tight enough to hold the wick and loose enough so that you can easily pull it out and down. Place the wick at the jar’s middle and hook the wires’ edges over the jar’s lips.
-
Step 4: Customize Your Jar
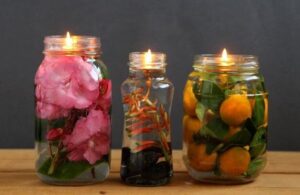
You can use various ideas to make your mason jar oil lamp smell or look better. First, add your favorite essential oil (Get the most recommended one) into the jars so that the lamps produce fragrant smells as it burns.
Consider orange, lime, or lemon, for a refreshing scent, lavender, or vanilla for a calming effect. Rosemary, mint, or eucalyptus also create some refreshing fragrances.
Alternatively, you can slip your favorite herbs into the jar to enjoy some faint scents as your lamp burns. They also help improve the lamp’s appearance.
Some of the herbs include rosemary, lavender, and thyme. You can even fill your jar with color using orange or lemon slices, cinnamon sticks, and pine sprigs.
Stir the mixture gently to incorporate the added elements and push them towards the jar’s walls leaving the middle part of the lamp empty. Don’t get too carried along since too many things will leave you with less fuel space.
You don’t have to use all the items. Just pick a few that bests suits the occasion. For instance, you can use shells for a beach themed lamp. If you want to create a festive atmosphere, use small pine cones, cedar cuttings, or holly berries.
Also, consider adding some food color to the water, stir it then place a little amount at the bottom of the jar. Add oil and the wick. The colored water will sink to the jar’s base while the oil floats on top, creating a colorful pattern.
As the lamp burns, water will push the oil upper so you can run your lamp longer.
Remember to empty and refill the water after some time to keep the contents fresh.
-
Step 5: Fill The Jar With Olive Oil
Pour olive oil into the jar about two-thirds full.
Olive oil is the most preferred since it doesn’t have dangerous chemicals, so it burns clean without producing awful smells. Leave enough space for the wick and ensure that it isn’t fully submerged in the oil.
Based on the method you choose, position the cork on the oil at the center or place the lid back onto the jar.
-
Step 6: Light And Enjoy
Your mason jar oil lamp is now ready to use. Nonetheless, you need to wait for around 15 minutes for the wick to soak up enough oil before lighting.
Still, remember to handle the lamp with caution. Place it on a sturdy surface away from curtains or any other materials that can easily catch fire. Also, never leave them unattended and keep them out of children’s reach.
Conclusion
A mason jar oil lamp is a cost-effective alternative to candles. Use the above steps to come up with a homemade oil lamp.
They are easily customizable, beautiful, and they produce unique scents. The lamp can run from a week up to a month based on your usage and its size.