If you have been searching for the perfect lighting for your garage, basement, workspace, or greenhouse, then your search has come to an end.
Barrina led lights are just the thing you need to get your workroom lit up for your next big project, illuminate the dark corners of your basement, or grow healthier plants.
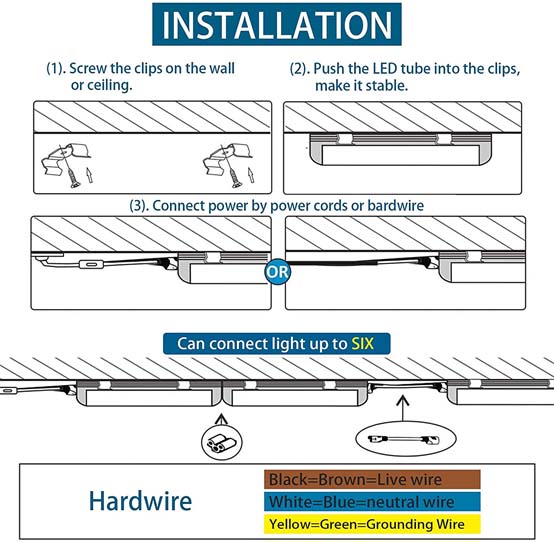
They could be either plug and play or hardwired to a wall switch.
Barrina led lights are eye-friendly, easy to install and save you installation cost because they can link up to four or more lights in a series.
This post guides you on how to hardwire Barrina LED lights by yourself.
How Many Wires Do Barrina LED Lights Have?
Barrina LED lights have three wires:
- The live wire which is usually covered by brown or black plastic has a high voltage and carries this high voltage and delivers it to the appliances. It is the most dangerous wire because of its high voltage and it is also called the hot wire.
- The neutral wire which is usually covered in blue or white plastic completes the circuit from the appliance back to the power source. It creates a return path for the current after it has passed through the appliances, it is usually at zero volts, and
- The grounding or earth wire (yellow/green) is connected to the earth and is also at zero volts. It is not part of the circuit and is only for safety.
How to Hardwire Barrina LED Shop Lights?
Barrina LED shop lights are mostly used for overhead garage lighting and to light up workrooms and basements.
They have high output, low power consumption, and are easy to install.
These are the steps to hardwire Barrina LED shop lights:
Step 1: Plan the Lighting Layout
To achieve an even spread of light across your garage or workspace, you need to create a lighting layout that illuminates your whole garage in the best way possible or that focuses on desired locations.
Step 2: Remove old lights
Old lights should be taken down to make room for the new ones.
Step 3: Hardwire the LED lights
Hardwiring the lights is a simple process. All you need to do is match up the right color wire to the wire in your ceiling. That is;
- Connect the live/hot (brown or black) wire to the brown/black wire, then
- Connect the neutral (blue or white) wire to the blue/white wire,
- And finally, connect the earth/grounding (yellow or green) wire to the yellow/green wire.
Step 4: Install the LED shop lights
Measure the space you want to leave between each LED strip and connect each light to the next using end-to-end connectors or connector chords.
The lights can be mounted from the ceiling using metal clips or double-sided tape.
After everything is connected, plug in the chord, switch on the socket, and your garage or workspace will be lit up!
When Should I Buy Barrina LED Light Connectors?
Barrina LED light connectors are an alternative method to the soldering connection method.
Although the soldering method is a more reliable way of connecting LED lights, it is also more expensive because it involves the use of a soldering iron, it requires long working hours, and it is difficult to use for anyone who is not a professional electrician.
LED light connectors, on the other hand, are easy and quick to use, cost less and allow multiple people to connect different parts at the same time.
For less experienced people who do not own a soldering iron but want to connect Barrina LED lights, Barrina LED light connectors are the best option.
How to Install Barrina LED Grow Lights?
Barrina LED grow lights provide the light that plants need, especially blue and red light, they reduce cultivation costs and prolong the flowering period of plants.
Blue light is necessary for plants because it promotes stem and leaf growth and aids photosynthesis.
Red light is vital in the early stages of plant life (seedling), it promotes seed germination, root growth, and bulb development.
Barrina LED grow lights are more efficient than ordinary grow lights, they promote early maturity and even improve fruit quality.
They are easy to install (plug and play) and can link up to 12 LED grow light strips in a series by 48 inches connecting cords.
Barrina LED grow lights provide indoor plants with full-spectrum sunlight to ensure the plants receive the type of lighting they need for the healthiest conditions and growth.
These are the steps to install Barrina LED grow lights;
Step 1: Unboxing the LED grow lights
Inside the Barrina LED grow light carton you will find the chord that will be used to plug it into the wall, end-to-end connectors, and connector chords that will be used to connect one light to another.
You will also find brackets, wire ties, and the LED grow lights themselves.
Step 2: Install lamp reflector
The aluminum lamp reflectors increase light efficiency by 17-20%. It is also quite easy to fasten it onto the lamps.
Step 3: Install the LED lights
The LED strips can be mounted on the ceiling using the provided metal clips, wire ties, or double-sided tape.
The 48-inch chords or the end-to-end connectors are used to connect the lamps and a cap is used on the final lamp port to cover exposed wires.
Step 4: Attach LED grow lights under plant shelf
- Select a shelf with at least 12 inches of space between each layer.
- Attach a chain to each hanging loop on the lamp fixture.
- Connect the lamps in series using the connectors.
- Switch on the socket.
Conclusion
Barrina LED lights are brighter, cheaper, and healthier than fluorescent light. They aid in plant growth and can be used in greenhouses, farms, or in-house plants.
There are many ways to connect them which makes them easy to install even for beginners.
Hope this post can help you in installation.