If you have purchased a stylish contemporary Threshold floor lamp with shelves to illuminate your living room then you would surely be fretting over ways to assemble it just the right way.
So, we have eased down the whole procedure for you to make your life easier and to save your time.
Time to Assemble the Beauty
The Threshold floor lamp comes with 3 shelves and supports a 100-watt bulb to brighten up your room.
All the three shelves have different load-bearing capacities depending on their respective weights and thickness; shelf no. 1 can bear a load of 1 pound, shelf no. 2 can hold a weight of 5 pounds and the last shelf, shelf no. 3 has a weight limit of 15 pounds.
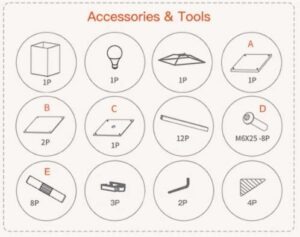
Coming to the first step, you have to take out all the items very cautiously from the box and take off the plastic coverings.
How to Assemble Threshold Floor Lamp with Shelves?
Step 1: Building The Shelf Stand
To assemble the bottom and the shelves, you start with taking the thick plastic base piece and the long poles, as well as the short screws along with the long screws.
Now place the plastic base (the heaviest and thickest one) piece in front of you on any flat surface and then adjust the four short screws on all the corners.
Each pole has a hole in the bottom, which has to be tightly fastened to the screws you have placed on the base piece.
For the next step, we will be placing the long screws into the ends of these long rods.
This will make a perfect space for our first shelf (weight capacity of 5 pounds) to be fitted on top of our four rods tightly. The shelf has small circular hole areas on each corner to hold the rods tightly.
Once the shelf is placed, there is enough space left to fit the next set of four poles into the screw. Take another four rods and attach them to each of the four screws on each corner of the shelf.
By now your shelf would have started to take shape.
Again, we are going to take the long screws and fit them at the end of each long pole in order to attach the next shelf (the lightest one).
Now take the final shelf and fit the pre-drilled holes on each corner into the long screws peeking out of the long poles.
Now our set of shelves is complete.
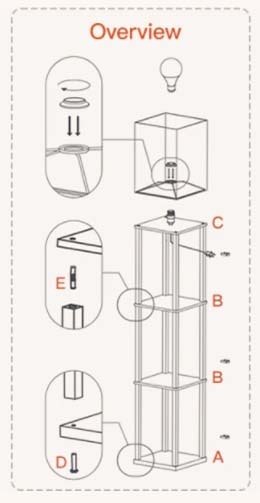
Step 2: Making Arrangements To Hold The Bulb
Take another set of four rods and tighten them on the long screws on the final shelf.
Once again we will be placing the long screws in each rod’s holes.
Then take the socket board, which has the same circular drills as the shelves had- and fit them on the top of the screws.
The socket board has a screw and socket for the bulb to place and a pull chain to switch on or switch off the light according to your needs.
The socket has attached with it a metal piece which will be attached in the middle of the socket board.
To hold it firmly in place, we will tighten the washal on the top of the metal piece which is being revealed at the bottom of the socket frame.
Now the bulb socket is also attached properly with the shelves.
Step 3: Final Touches
Now again attach the remaining 4 rods with each of the screws exposed on the socket frame.
Finally, take the plastic shade and slide it between the rods and top it off with the final plastic piece to keep the shade in place and the whole compilation sturdy.
The plastic piece will be tightened through the tiny screws on top of the shade. You will be needing a screwdriver to complete the final step. The plastic piece gives the final touch and finishing to the floor lamp.
The last thing to do is cable management. Remove the plastic ties from the power cord, attach the cable to one of the poles or legs of the threshold floor lamp.
Place the bulb in the socket and your threshold floor lamp with shelves is ready to be used and brighten up the ambiance.
Check the short video to make the tricky steps more understandable: