Lamps, in addition to windows and ceiling lights, play an important function in lighting your room. They not only brighten your room but also lamp up and complement the interior and décor of your home.
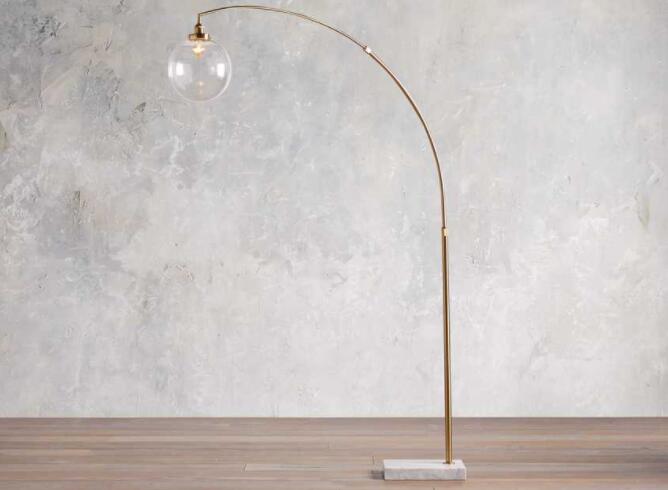
The appealing and unusual form of an arc floor lamp, also known as an arch floor lamp, tends to catch people’s attention to it right away. Their bent or curved neck makes it simpler to focus the light on the target location.
Arc lamps come in a variety of sizes, shapes and designs, making it easier for you to choose one according to your preferences. Arc lamps typically come with a single swing arm and you can install them easily.
To make things easier for you, we have come up with these simple instructions on how to assemble your arc floor lamps in no time.
How to Assemble Arc Floor Lamp?
Step 1: Make Some Room
Clear up the space where you are going to install your arc lamp and lay all the lamp’s parts in a neat manner.
This will allow you to get your hands on the required part in a swift manner.
Step 2: Insert The Metal Rod Into The Pole
Now check the base of the lamp, it must entail a hole. Slip the metal rod into that hole. Once done, take the connector handle and push it into the hole that’s located at the top left corner of the lamp’s base.
Step 3: Insert The Base Screw
Spot the hole in the metal rod and proceed with inserting the base screw through it and the base hole at the same time.
Tighten the components together by turning the screw clockwise.
Step 4: Pull The Wire
Now, tug the wiring through the metal rod and thread the wire guide onto the cable from the top.
Step 5: Connect The Channel Onto The Wire
Attach the big channel of the light onto the wire from the top loose end of the cable.
Now, push the channel into the metal rod so that the electrical wiring is housed in the main channel’s lower channel.
Once done, drag the free end of the wire from the top while passing the wiring through the small and medium channels.
Step 6: Loosen The Lamp Socket Screw
Turn the lamp socket screw in a counterclockwise direction to loosen it. While unscrewing the socket from the nipple, make sure to press the retention clip in.
Pull the socket out of the way so you can see the screws you’ll need to install the lamp.
Step 7: Connect The Wire
Connect the smooth wire to the brass screw in a clockwise fashion and tighten the screw clockwise as well.
Then, in a clockwise manner, wrap the wire with ridges around the silver screw and secure it in the same way.
Step 8: Attach The Socket
To attach the socket to the nipple, just snap it in place. It will be secured by the retention clip.
Put a bulb in the lamp and tighten the socket screw clockwise.
Step 9: Fix The Deflector
Now, fix the deflector of the lamp into the end of the channel.
Make sure the lamp sleeve is placed over the deflector before pressing the outer grid onto the sleeve.
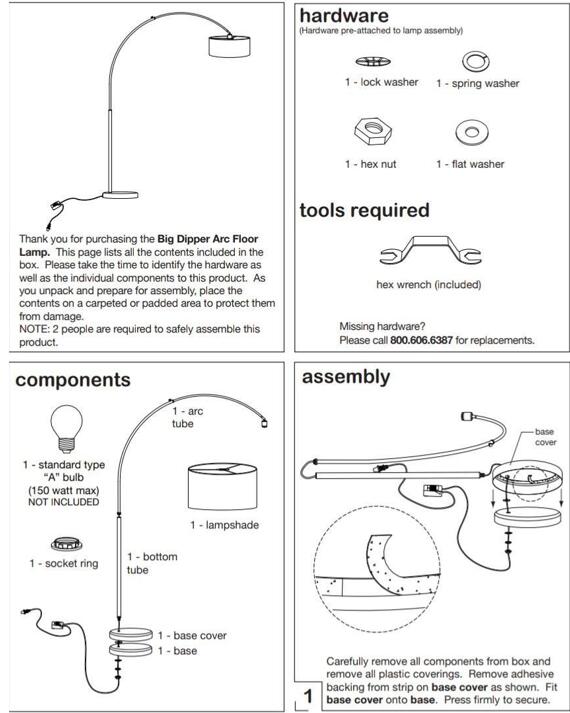
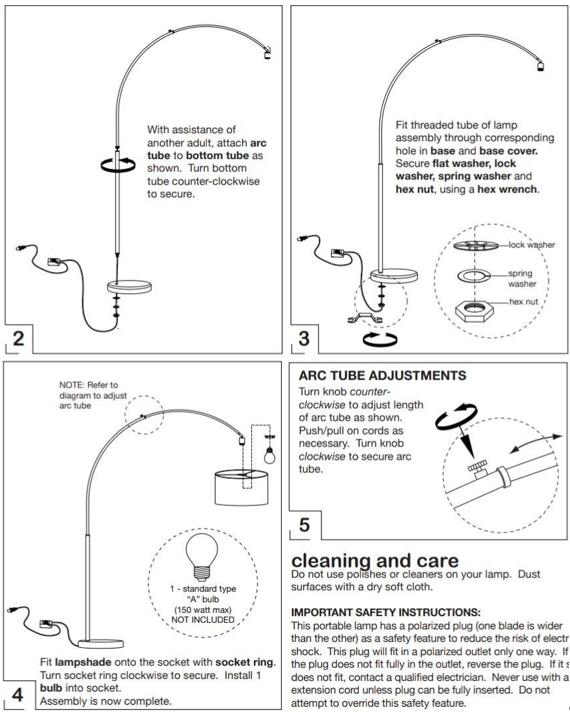
Note: To make things easier, here’s a picture guide of how to assemble your arc floor lamp.
Here is a video guide for your reference: